CLICK HERE FOR FREE BLOGGER TEMPLATES, LINK BUTTONS AND MORE! »
*** Just a note to those following my blog, but not following a gluten free diet, with just a simple adjustment to the recipes they can be full of gluten. Substitutes: any gluten free flour/mix use wheat flour and omit the xanthan gum. ***

Tuesday, March 27, 2012

Gluten Free Banana Bread

Banana Bread has been something that I have had a hard time finding a good gluten free recipe for.  Yesterday I had some bananas that needed to be used up so I decided to try another recipe.  I found it here.  When I first cut into it I wasn't sure if I was going to like it.  It seemed like it was going to be mushy like the rest.  The first piece was a little mushy, but not like the other recipes I have made.  Each piece seemed to get better!!  One thing I don't like with banana bread is even if its good the first day it turns mushy by the next day, so I had to try it this morning of course AND It wasn't mushy!!  YAY!!!!  It is the best gluten free banana bread I have made so far.  
Preheat oven to 350 degrees

Ingredients:
2 cups      gluten-free all purpose baking flour
  (I used 1 1/2 cups featherlight mix + 1/2 cup GF mix + 1 tsp xanthan gum)
1 tsp         baking soda
1/4 tsp     salt
4               eggs
2 cups      mashed bananas (4-5 medium)
1 cup        sugar
1/2 cup    unsweetened applesauce
1/3 cup    canola oil
1 tsp         vanilla extract
1/2 cup    chopped walnuts

Directions:
In a large bowl, combine the flour mixes, xanthan gum, baking soda and salt.  Set aside.  In a medium bowl, whisk the eggs, bananas, sugar, applesauce, oil and vanilla.  Stir into the dry ingredients just until moistened.

Transfer to 2 - 4"x8" loaf pans coated with cooking spray.  Sprinkle with walnuts (My family, besides me, aren't fond of nuts so I made one with and one without the nuts.)  Bake at 350 for 45-55 minutes or until a toothpick inserted near the center comes out clean.  Cool for 10 minutes before removing from pans to wire racks.  Yield: 2 loaves - 12 slices each

Weight Watcher points: 4 points/slice

Monday, March 26, 2012

Baked Chicken Lasagna Roll Ups (Made Gluten Free of course)

Awhile back my friend told me about a new recipe she made.  She found it here.  It sounded really good and I'm always looking for new dinner ideas, so I decided to give it a try.  It was a hit and I've made it several times since then.  It was really easy to adjust to be gluten free, just by using gluten free lasagna noodles.  I did make a couple other adjustments too.

 Ingredients:
2 cups                Ricotta Cheese
1 1/4 cups         Mozzarella Cheese, shredded
1/4 cup              Parmesan Cheese (I use the grated because that is what I have on hand.)
1                         Egg
1 tsp                   Garlic Powder
2 TBSP               Parsley Flakes (I forgot these this time and it was still good.)
1/2 tsp               Salt
1/2 tsp               Black Pepper
6-8                     Chicken tenders, chopped (I used my Pampered Chef chopper.)
10                      Lasagna Noodles (I use Tinkyada brown rice lasagna noodles)
1 bottle             Spaghetti Sauce

Directions:   Preheat oven to 375 degrees
Boil the lasagna noodles for about half the time on stated on package.  Drain.
Mix first 8 ingredients, reserving 1/4 cup of Mozzarella cheese for the top.  Set aside.
Spread some spaghetti sauce in the bottom of a 9" x 13" pan.

Lay out a lasagna noodle.  Spread ricotta cheese mixture over noodle.  Top with chopped chicken.  

 Roll the noodle

 Put seam side down in the pan.  Repeat until you have used all the noodles.

 Pour the remaining spaghetti sauce over the top.

Sprinkle the top with reserved mozzarella cheese.  Bake for 20-25 minutes.

Sunday, March 25, 2012

Gluten Free Baked Oatmeal

We were leaving early in the morning to go watch my husband run a 25K trail race on Saturday.  I  always make muffins or something we can easily take for breakfast.  When I saw this recipe on Pinterest here I knew I wanted to try it.  It was healthier than the muffins I was going to make and I love oatmeal.   I really enjoyed them and they are only 2 weight watcher points+ without toppings.  I will definitely be keeping these around for a quick, easy, and healthy breakfast option!!!


Ingredients:
2 eggs
2 cups applesauce, unsweetened
5 cups, Old Fashioned rolled oats (I used certified gluten free oats.)
1 banana, mashed
2 3/4 cups milk (I used 1%)
1/4 cup flaxseed meal
6 packets of Sweetleaf Stevia or 1 1/2 teaspoons stevia powder (I used Truvia)
1 tablespoon ground cinnamon
3 teaspoon baking powder
1 teaspoon vanilla extract
1 teaspoon salt
Optional toppings: raisins, walnuts, chocolate chips


Directions:
Preheat oven to 350 degrees.
Mix eggs, vanilla, applesauce, banana and Stevia together in a bowl.
Add in oats, salt, baking powder, flax and cinnamon and mix well with wet ingredients.
Finally pour in milk and combine.
Spray muffin tin or cupcake liners with cooking spray.  (I got 28 muffins.)
Pour mixture evenly into muffin tin cups.  (I use the Pampered Chef Large Scoop.)
If using toppings add them onto the tops of muffins now. If using fresh or frozen fruit, drop it right into the batter.
Bake 30 minutes until a toothpick in center comes out clean. Cool and enjoy or freeze them in gallon freezer bags.


Additional Notes:
*  Use a half cup to one cup of honey in place of stevia if you don’t have any.
*  The batter will look RUNNY, don’t worry!
*  Freeze them in an airtight container or Ziploc bag after they have cooled. Thaw overnight in    refrigerator for morning you want them.  Reheat 45-60 seconds.


Tuesday, March 20, 2012

Gluten Free Pizza Crust

Life has been crazy here, so I haven't had a chance to post any recipes for a few days.  Here is a great one that I got at our GIG support group.  Judy Ball has been gluten free for 30 years and was the one that developed this pizza crust recipe.  It is a really easy, which is a HUGE BONUS for me!!!  I like easy!!

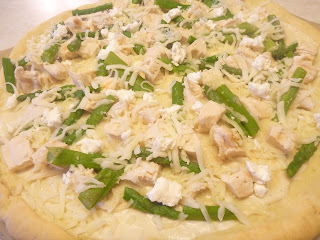
 Chicken Alfredo Pizza: Alfredo Sauce, cooked & cubed chicken, asparagus tips (steamed), mozzerella cheese & goat cheese

Gluten Free Pizza Crust Recipe:
Pre-heat oven to 400 degrees
Dry Ingredients:

2 cups + 2 Tbsp.     GF Flour Mix (You can find the recipe at bottom of this page.)
2 1/2 tsp                 Xanthan Gum
1 1/2 tsp                 Sugar
1 tsp                       Salt
4 tsp                       Deb El Just Whites egg white powder (I used 4 eggs and used a little less water)
(2 tsp                      Quick Rising Yeast (I used the Bread Machine Yeast)

Wet Ingredients:

1 tsp                       Vinegar (I used apple cider vinegar)
1 3/4 cups              Warm Water (110-115 degrees)

Mix dry ingredients together.  Add wet ingredients and mix.  Beat 3 minutes.  Spray cookie sheet or pizza pan with non-stick cooking spray. 


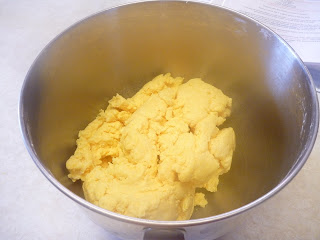
 This is what it will look like when you are done mixing.  It will be wet, kind of like frosting.

Spread with a spatula! 
For a thicker crust I spread all on one pizza pan. For a thinner crust (which we liked better) I split the dough between 2 pizza stones.

Bake for 20-30 minutes.  Top with sauce, cheese & toppings of your choice.  Then bake for another 8-10 minutes longer.  I would cook it more on the longer side with the thicker crust.

 The second time I made it I split it between two pizzas and made one cheese for the kids.  They still like our family's favorite GF pizza found here better. 

The second one I made Barbecue Chicken Pizza, which my husband and I loved.  It had the thin crispy crust, which we really liked.  We added my husband's secret homemade BBQ sauce, mozzerella cheese, shredded chicken, sliced olives and tomatoes.


Another idea that they had for us to sample at our support group was they used the same crust and made it into a dessert pizza.  It was really good!!!  I just haven't done it yet.  They baked it like normal then you spread melted butter over the crust and sprinkle with cinnamon. 
Dipping sauce for dessert pizza:  Mix together 1-2 cups of powdered sugar and 1 Tbsp. melted butter.  Add enough milk or water until it is the consistency you like.

Friday, March 16, 2012

Chicken Enchilada Pasta made Gluten Free

I first found this recipe on pinterest here.  We have made it twice now.  I think its a definite keeper!  It is so GOOOD!!!


2-3 chicken breasts, cooked & shredded
2 tbsp. olive oil
2 garlic cloves, minced
1 medium onion, diced
1 red pepper, diced
1 {4 oz.} can diced green chiles (I haven't used these.)
1/2 tsp. salt
2 tsp. chili powder
1 tsp. cumin
2 {10 oz.} cans green chili enchilada sauce *
2/3 cups red enchilada sauce *
2 cups shredded cheese
1 cup sour cream
Penne pasta (I used gluten free spiral pasta.)

* When we made it yesterday we only used 1 can green chili enchilada sauce and used more red sauce (around 2 cups)

Optional toppings
: Avocado, Green Onions, Black Olives, Tomatoes & Sour Cream

Cook chicken and shred.  Meanwhile boil pasta according to package and chop the veggies.
Heat the olive oil in a deep skillet and cook onions for about 3-5 minutes. Add garlic & red pepper and cook for another 3-5 minutes.

Add cooked chicken, green chiles, cumin, chili powder, salt, & enchilada sauces. Let sauce simmer for about 8-10 minutes.

Add cheese and stir until the cheese is melted and heated through. Now toss in the sour cream, but whatever you do, DO NOT bring to a boil! Cook on low heat or the sour cream will curdle.  Stir until sour cream is well mixed and heated through.


Drain pasta & return to pot. Pour sauce over pasta and mix well. Serve and garnish with avocado, tomato, green onion, and a dollop of sour cream.

Thursday, March 15, 2012

Gluten Free Yogurt Pie

When I heard it was National Pi Day yesterday I decided it was a great excuse to make a pie.  I decided to do our favorite yogurt pie.  It is low fat, easy and YUMMY!!!  I was first introduced to this yogurt pie when I was dating my husband.  It has been a favorite of ours ever since.  Recently we added the berries to it and love it even more!!

 Ingredients:
Graham Cracker Crust (I will share the recipe I use below)
8 oz cool whip
2- 8 oz yogurts (we like to use berry flavors - 2 different ones)
1 cup fruit (optional)

 I use the Graham Cracker Crust recipe from the Better Homes & Gardens Cook Book:
1/3 cup butter (melted)
1/4 cup sugar
1 1/4 cup graham cracker crumbs - Gluten Free of course

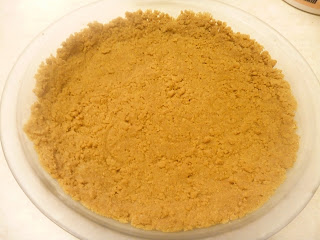
Mix in a small bowl then press into a 9" pie plate.  Either chill for one hour or bake at 375 degrees for 4-5 minutes.  Cool before filling.

 Beat cool whip and yogurt together until mixed.  Fold in fruit.  Pour into crust.  Put in freezer until set or frozen.  (I had some extra graham cracker crumbs so I put some on top.)

Enjoy a low fat treat!!!

Monday, March 12, 2012

Veggie Lasagna with Gluten Free Noodles

I must first mention that I am not a huge fan of some of the veggies in this lasagna, but I LOVE this lasagna.  So don't let the veggies stop you from trying it.  It is so easy and so delicious!!!  It has taken a few times to get my kids to eat it, but last night my pickiest eater ate it all gone!!!  HURRAY!!!!  She may not have loved it, but she ate it!!  I saw the original recipe on my friend's blog here.  I used gluten free noodles, of course, and made a few changes.

Ingredients:
Gluten Free Lasagna Noodles (I use Tinkyada)
Water
Bottle of Spaghetti Sauce (We like Prego Traditional)
1 pkg. sliced mushrooms
2-3 zucchinis, sliced
2-3 TBSP butter
Spinach
Mozzerella Cheese

 Pre-heat oven to 350 degrees.
Wash & slice your zucchini.  Saute your mushrooms & zucchini in some butter. 

 Once your veggies are cooked, add your spaghetti sauce (make sure to pour some in bottom of pan first and save some for top of lasagna).  Heat until bubbly.

Layer:  Noodles
 I hate to deal with cooked lasagna noodles, so here's my trick to avoid that and make it easier to make lasagna.  I add dry noodles and pour some water over the top of them (each layer).  Don't mind all the broken noodles.  :)

Veggies w/ Spaghetti Sauce

Spinach

Mozzerella Cheese

Repeat layers one more time, then add another layer of noodles with reserved spaghetti sauce and topped with some more mozzerella cheese.  Cover with tin foil and bake for 45 minutes.  After the 45 minutes, because you are using dry noodles, you may need to pull it out, push the noodles down into the liquid and cook for another 5-10 minutes.  Pull out of oven and let sit for 10-15 minutes.  The liquid will be absorbed by the noodles, the longer it sits.  We like to enjoy with some breadsticks from Charlotte's Bakery.  We buy ours at Good Earth, but I know they can ship their products too.

Sunday, March 11, 2012

Hot Dog Gluten Free Style

Gluten Free hot dog buns are not easy to come by.  I saw the idea online to use a corn tortilla instead.  I must say it is soooooo much better than a bun, even better than a gluten filled bun!!  I have shared this idea with some friends that don't live a gluten free lifestyle and they have made the switch over!!  My husband says it tastes like a corn dog!  I'm not sure I agree with that statement, but I like them anyways. 


Warm the tortillas in a wet paper towel in the microwave for 30-45 seconds
(depends on number of tortillas)
You can add whatever you would like, but we put shredded cheese on the bottom, add the hot dog and ketchup on top.  My husband likes to add parmesan cheese on top too.


Roll Up and Enjoy!!

Peanut Butter and Nutella Tortilla Roll Ups

My kids aren't huge fans of gluten free bread, but they LOVE "tortilla roll ups" as we call them.  You can use corn tortillas in place of bread for almost anything!!  This is their favorite combination:  Peanut Butter and Nutella!!  We have made several combinations.  Here is a few ideas you can do, but the options are limitless:

Peanut Butter & Nutella
Peanut Butter & Jam
Peanut Butter & Honey
Peanut Butter & Banana
Peanut Butter, Nutella & Banana
(You could use any nut butter you like.)
Egg Salad


Warm tortillas between a wet paper towel in the microwave 30-45 seconds
(depending on number of tortillas) 
Spread Peanut Butter & Nutella (or whatever combination you want) on the warmed tortillas.


Roll up and Enjoy!!!

Friday, March 9, 2012

Gluten Free Waffle Ice Cream Cones

One of my favorite foods is ice cream!!  When I was diagnosed with Celiac Disease I was sad that I wouldn't be able to have ice cream cones anymore.  I found this recipe within a few months of going gluten free.  It is one of my FAVORITES!!!!!!!!  I cannot tell you enough how GOOD these are.  SO DELICIOUS!!!


I found the recipe here.  Once I found the recipe I knew I had to get the waffle cone maker.  I wasn't sure if I would really use it very often, but these are so good that we made them probably way too often at first.  This is the waffle cone maker I bought.  I LOVE it!!!

Gluten Free Waffle Cones 
*I usually double or four times the recipe.  Doubling = around 24 cones*

3             eggs
3/4 cup   sugar
1/2 cup   butter, melted and cooled
2 Tbsp     vanilla
3/4 cup   Featherlight mix
1/4 cup   GF mix*
3/4 tsp    xanthan gum
1 tsp       baking powder

Beat eggs, gradually adding sugar. Add cooled butter and vanilla. In other bowl, combine flour mixes, xanthan gum, and baking powder. Blend into egg mixture until smooth. Dough will be sticky. Drop 2-3 TBSPs batter (I use the large Pampered Chef scoop.) onto a hot waffle cone baker.

I set the waffle cone maker between the 3 and 4 setting and bake for 60-75 seconds. Remove from baker and either roll around a waffle cone shaper or drape over an upside-down bowl or cup. The cone will harden quickly as it cools.

Here's a video showing how to roll the waffle cones!!

Be sure to leave waffle cone on the cone shaper until it has a hardened a little!!

Be sure to handle with care, they are fragile, but so good!!!!
* Here is the Bette Hagman's GF Flour Mix:
6 cups     rice flour
2 cups     potato starch (not potato flour)
1 cup       tapioca starch

Thursday, March 8, 2012

Gluten Free Chicken Enchiladas

These enchiladas are a quick and easy (maybe messy) dinner to make and YUMMY!!


Ingredients:
10-12 corn tortillas
6-8 chicken tenders
20 oz enchilada sauce
Grated cheddar cheese
onion, chopped (optional)


I like to cook my chicken on my foreman grill. If you don't have one, that's fine, just brown on the stove. I like mine chopped, but you can just cut the chicken into bite-size pieces if you'd prefer. You can also use beef if you'd prefer. Chicken is just the easiest and its really yummy, so that is what I do 99% of the time. 

Pour a small amount of enchilada sauce in the bottom of your 9 x 13 pan to help prevent sticking.  I wrap 4-5 tortillas in a wet paper towel and heat for 45 seconds to make it more pliable to roll.  Dip the tortillas in enchilada sauce, fill with chicken, cheese & onion (if you want).  Roll up and put seam side down in pan.  Repeat. 
Pour the remaining enchilada sauce over the top. Top with cheese. Cover with tin foil and bake at 350 degrees for 20 minutes.  I like to serve with refried beans and spanish rice (if I have the time to make it) 

Tuesday, March 6, 2012

Gluten Free Nut Butter Energy Bars


These are a great healthy snack with lots of good protein that will help give you an energy boost!!  They are simple and YUMMY!!!

Ingredients:
3/4 cup      nut butter (almond, peanut or sun)  (I use almond butter)
3/4 cup      agave nectar or honey (I use agave)
1 1/2 cups  raw nuts and/or seeds (I use almonds, walnuts & sunflower seeds)
1 cup          unsulfured dried fruits (I have used apricots, mangos & pineapple)
4 cups        gluten free brown rice crispie cereal
1/8 tsp       sea salt
1 tsp          vanilla extract
1/4 cup      coconut (optional)

Directions:
1.  Line a large baking sheet with parchment or wax paper.
2.  Place nuts and/or seeds & dried fruits in food processor/blender.  Pulse until mixture is just coarsely ground.  (I don't have a food processor so I use a blender)
3.  In a large sauce pan, melt nut butter & liquid sweetener over medium low heat.  Stir and watch to prevent scorching.  When mixture is smooth and bubbling, remove from heat.
4.  Add salt and vanilla, stir.
5.  Use large spatula to stir in nuts, dried fruit and cereal.  Stir until all coated with nut butter mixture.
6.  Scoop onto baking pan & roll until its smooth and even thickness.  (I like to top with plastic wrap before rolling)  Top with wax paper or plastic wrap and refrigerate for 2 hours.
7.  Cut into bars, store wrapped in wax paper, in a covered container in the refrigerator.

Monday, March 5, 2012

Gluten Free Bread Machine White Bread


When I first started trying to make gluten free bread I didn't have any success.  I could never get it to rise!!  It would always be about the size of a loaf of banana bread.  That was until I got a wonderful bread machine and it has come out perfect ever since!!!  I did a lot of research as to which bread machine to buy.  I finally decided on the Zojirushi model: BB-CEC20.  You can find it here.  I also bought this cookbook to go along with it. 

I decided on this one for several reasons.  Here are my top three reasons:
**  Lots of Great Reviews!!!
**  Normal loaf of bread shape!!
**  I could program it specially for gluten free bread!!


I have loved having this breadmaker.  It has made cooking gluten free bread so EASY!!!!  And to make it even easier I will mix up the dry ingredients for 4 loaves at a time.  I put them in a Ziplock baggie and label them.   Then when I need to make a loaf of bread, I just put the wet ingredients in the pan, wait for them to pre-heat, then add the dry ingredients.  It is really easy and doesn't take a lot of my time.

Here is the "White Bread" Recipe out of the cookbook I mentioned above. 

Dry ingredients:
2 1/4 cups     brown rice flour
2/3 cups        potato starch
1/3 cup         tapioca starch
1/4 cup         nonfat dry milk/skim milk powder (I leave this out.)
1/4 cup         sugar
2 1/2 tsp       xanthan gum
1 1/4 tsp       bread machine or instant yeast
1 3/4 tsp       salt

Wet ingredients:
1 1/4 cups    water (I use milk)
1/4 cup         vegetable oil (I use canola oil)
1 tsp             cider vinegar (I use apple cider vinegar)
2                   eggs, lightly beaten
2                   egg whites, lightly beaten

*In a large bowl or plastic bag, combine all the dry ingredients, mix well & set aside.
*Add wet ingredients into the bread machine baking pan.
*Select the Dough Cycle.  As the bread machine is mixing, gradually add the dry ingredients, scraping bottome & sides of pan witha rubber spatula.  Try to incorporate all the dry ingredients within 1-2 minutes.  When the mixing and kneading are complete, remove the kneading blade, leaving the bread pan in the bread machine.  Quickly smooth the top of the loaf.  Allow the cycle to finish.  Turn off the bread machine
*Select the Bake Cycle.  Set time to 60 minutes and temperature to 350 degrees.  Allow the cycle to finish. 

With Gluten Free Bread it is very important to take the internal temperature!!  It may look done on the outside, but the inside may not be done!!

Do not turn machine off before taking the internal temperature of the loaf with an instant-read thermometer.  It should be 200 degrees.  If its between 180 degrees and 200 degrees, leave machine on Keep Warm Cycle until baked.  If its below 180 degrees, turn on the Bake Cycle and check the internal temperature every 10 minutes.  (Some bread machines are automatically set for 60 minutes; others needd to be set by 10 minute intervals)

**With my breadmachine it is even easier than the above directions.  I have already programmed it for gluten free bread so I just put the wet ingredients into the bread pan and select the correct course and press start.  Mine has a preheat, so I don't have to worry about the temperature of the wet ingredients when I put them in.  After the pre-heat it starts to mix that's when I add the dry ingredients and help incorporate the dry with the wet ingredients.  When it is all done mixing, I will smooth out the top and that's it!!!  It does the rest;  I just wait and pull it out when it is done***


Here's my settings:
Preheat: 15 minutes
Knead: 20 minutes  (It starts slow, that's when I add the dry ingredients.)
For this breadmaker turn off Rise1 and Rise2
Rise: 70 minutes
Bake: 65 minutes


Another thing I LOVE about this breadmaker is that the bread comes out soooo EASY!!!!  I don't have to spray it and the bread NEVER sticks to the pan!!!

Sunday, March 4, 2012

Gluten Free Baked - Fried Chicken

Since we can no longer have anything at KFC I was excited when I saw this recipe on one of my friends blogs.  It is really simple and tastes a lot like the KFC seasoning as I remember.  And even better, it is baked and not fried.  I only had to make one small change to make it gluten free!!   I LOVE it!!  I usually serve it with mashed potatoes and a veggie.


Place thawed chicken breast tenderloin strips in a bowl of milk. Let soak for 20-30 min.

Mix in a Gallon Size Ziploc or Large Bowl:

1/2 tsp. Salt
1 T Season All
3/4 tsp Pepper
1 c. Featherlight Mix or
(Gluten Free Flour of your choice)
2 tsp. Paprika

Preheat oven to 400 degrees. Cut 2-4 TBSP of butter into a few pieces and place in a 9x13 pan. Melt butter in pre-heated oven.

Spread melted butter around the bottom of the pan.

Shake excess milk off of chicken and completely coat each piece with the seasoning mix. You can either shake the chicken in the bag, until coated, or dip each piece in the bowl until coated.
Place each piece of chicken in the pan.

Cook for 20 min. Turn each piece of chicken and continue cooking for 20 more minutes, or until cooked through.

You can find the original recipe here

Saturday, March 3, 2012

Vegetable Beef Soup (Tree Soup)

This soup has been a favorite even before going gluten free.  I am going to post it because it is a favorite and I know some people are looking for some different dinner recipes. 


1 lb. stew meat 
2 cups tomato juice
3 cups water
2 tsps beef bouillon paste (2 cubes) **Just make sure the bouillon is gluten free - check the label.  I use Better than Bouillon paste!!**
1 med. onion, chopped
1-2 stalks celery, diced

Put above ingredients in large pot & simmer until the meat is well cooked.  

Add:
potatoes (as many as desired)
carrots (as many as desired)

Cook until almost done. 

Then add:
broccoli (as much as desired)
cabbage (as much as desired)
I like a chunky soup, so I always end up adding more tomato juice and water to cover.

Continue to cook until everything is done.

We like to serve it with mozzerella cheese sticks (string cheese) or swiss cheese.

*** Yesterday was the first time I made this in a crock pot. I did the first step on the stove, then added the potatoes and carrots and the pot of broth/meat into the crock pot. I cooked on high for 3-4 hours, then added the broccoli and cabbage an hour before eating. It worked great. ***

Friday, March 2, 2012

Gluten Free Gold Fish

Sorry it has been awhile since my last post, but today is a great one!!This is one of my favorite recipes I found once I was diagnosed with Celiac Disease!!  I found it at Adventures of a Gluten Free Mom, one of my favorite Gluten Free blogs.  She got the recipe from You Won't Believe Its Gluten Free recipe book.  It is a simple recipe and definitely worth the effort.

Gluten Free Goldfish

Ingredients:
4 oz. Cheddar Cheese, shredded (I use Sharp)
4 Tbs. Butter
3/4 c. Cornstarch
1/4 tsp. Salt
1/4 tsp. Xanthan Gum
1/2 tsp. Baking Powder
2 Tbs. Milk
Salt
 
Directions:
Preheat oven to 400 F. Lightly grease a baking sheet. (I use a stone, so I don't grease it, not sure if you would need to.)

Combine all the ingredients, except the milk, in a medium size-bowl. Mix until the mixture resembles a fine crumb. Add the milk and beat well.  Above picture is what it will look like when it is done.  You may not think it will get there, but it will.

In between parchment paper (bottom) and plastic wrap (top) pat or roll the dough to 1/8-inch thickness. Cut into 3/4 inch squares or another small shape (I like to do Goldfish) that you like.  You can also cut the dough into larger round or square shapes, just extend the cooking time.


I got my small fish cookie cutter at www.coppergifts.com
It is the fish mini-tiny. 


 Prick the tops of the crackers with a fork and sprinkle lightly with your salt. Bake on the prepared baking sheet until golden brown and crisp, approximately 10 minutes.


The crackers will be light and crispy, although barely browning at the edges. The bottom of the crackers will have a bit more color.
(Blogger has a mind of its own and I can't change the font of the last two sections :) )